Setting Up Your Project in Scrivener by Vanessa Kier
 Let’s welcome back monthly columnist, Vanessa Kier as she shares with us “Setting Up Your Project in Scrivener.” Enjoy!
Learn the five simple steps to get you comfortable with Scrivener so you can get back to writing your novel. Join us for this webinar training with Vanessa Kier! http://writersfunzone.com/
***
Setting up a project in Scrivener can seem a bit confusing to someone who’s used to creating a simple word processing document.
In this article I’ll walk you through how to decide which of Scrivener’s project templates to choose when creating your project.
When you create a Scrivener project, you have to choose a project template. Each template comes with certain standard components already set up for you, so you don’t have to manually set up those components.
Plus, Scrivener has assigned custom icons to certain items that provide visual cues as to the purpose of that item. For example, an icon of a map indicates the Places folder.
The Basic Scrivener Structure
Before you decide which project template is best for your project, you should understand a bit about Scrivener’s basic structure.
A project is broken into folders and documents. Your project’s arrangement of folders and documents will be viewable in a sidebar that Scrivener calls the Binder.
Every project template has at least three basic folders in the Binder: Draft, Research, and Trash. You can rename these folders, but you can’t delete them.
The Draft folder is where you’ll keep the body of your project, such as your Chapters and Scenes.
Depending on the template you choose, the Draft folder might have another name. For example, in Fiction and Non-Fiction templates it’s called Manuscript, but in the Screenplay template it’s called Screenplay.
Each template has at least one text document in the Draft folder. That document may be called Scene, Section, etc. The Draft folder may also contain one or more Chapter folders.
The Draft folder can only store text documents and folders. Images can be inserted into a text document, but you cannot add a standalone image file or a PDF to the Binder under the Draft folder.
You can put non-text documents in folders outside of the Draft folder. You can also create as many custom folders as you need.
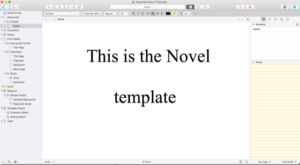
Standard Folders
Standard folders that may be included in a Scrivener project template include:
- Characters – For storing documents and image files relating to your characters
- Places – For storing documents and image files relating to your settings
- Front Matter – For holding items such as a cover image and a title page that Scrivener will add to the front of the manuscript during the Compile process
- Back Matter – For holding items such as end notes that Scrivener will add to the end of a manuscript during the Compile process
- Notes
- Ideas
- Research
- Templates – Contains basic Character and Setting sheets that include prompts for filling in common data, such as Physical Description, for characters.
- Trash – Scrivener does not automatically empty the trash. So, as long as you haven’t manually emptied the trash, if you need to restore a deleted item it’s still right there in the project.
Which Project Template Is Right for You?
Before selecting a template, think about how you want to structure the project (Acts, Parts, Chapters, Folders, etc.) and whether you want to track character and setting information. Are there special documents (Foreword, End Notes, etc.) that you need to include?
Now look at my Scrivener Project Templates Checklist to see which of Scrivener’s core components are included in certain templates and to get my recommendation for templates that work well with a few common project structures.
Create the Project
Once you know how you want your project to be structured, open Scrivener.
If you’ve never used Scrivener before, you’ll get the project chooser window. Or you can create a new project by going to File>>New Project.

On the left are the project template categories. Click on one of the categories and the available Scrivener templates will appear in the right-hand pane.
If you’re working in Scrivener 2 for the Mac or Scrivener 1 for Windows, clicking on an individual template will show you a description of the template. Scrivener 3 for the Mac doesn’t have this.
Except for the Blank Template, all of the other templates come with an explanatory document at the top of the Binder to help you understand the features of that particular template.
Every template has a default format for the Compile process (the process where Scrivener applies formatting in preparation of exporting the material).
For example, the Poem template will apply Courier font to your text during Compile. However, these settings are customizable.
Some templates come with special formatting in the Editor window (where you type your main content). For example, the Screenplay template gives you preset formats for indicating dialogue, action, character, etc.
Once you’ve decided on a template click Choose. You will then be asked to name it and to pick where it will be saved. Hit Create.
Welcome to your new project!
The great thing about Scrivener is that you can change the structure at any point in your writing process. If you start writing and discover that you need more organization, add folders and documents to your heart’s content.
Realize you’re not going to track something? As long as you didn’t put it in one of those default folders (Draft, Research, Trash) it can be deleted.
If you develop a setup that you’ll want to use for future projects, save it as a Project Template by going to File>>Save as Template. Then it will appear in the project chooser the next time you’re ready to set up a project.
I hope this made the setup process a little easier.
If you’d like to see what the Blank project template looks like and why you might want to use it, check out my YouTube video. This is the first in a series where I’ll demonstrate some of the more popular Scrivener templates in action.
Until next time, Happy Writing!
***
ABOUT THE AUTHOR
 TEACHER/TECH SPECIALIST FOR WRITERS/NOVELIST
Vanessa Kier combined her love of teaching and her fascination with technology to form The Writer’s Tech Stop https://thewriterstechstop.com, where writers can get coaching, classes, and services related to Scrivener and other writer-related tech. She also writes action-packed romantic thrillers with an edge. https://www.vanessakier.com. When not working, she likes to take long hikes in the local hills, play puzzle games on her mobile device, and read.

